


If your pool light timer isn’t working, start by confirming power at the input terminals with an AC voltage meter and checking your circuit breaker. Common culprits include slipped or bent trippers on the dial, corroded copper contacts showing green oxidation, loose terminal connections, or a burned-out timer motor with stationary gears despite confirmed power. Each of these faults has a specific diagnostic path and fix you’ll find broken down below. When setting up your system, consider the best practices for pool lighting systems to ensure optimal performance and safety. Choosing energy-efficient LED fixtures can significantly reduce your electrical usage while providing adequate illumination.
Check the Power Supply to Your Pool Light Timer
When your pool light timer stops working, the power supply is the first checkpoint in your diagnostic sequence. Start by confirming the circuit breaker hasn’t tripped at your main panel or sub-panel. For pool timer wiring configurations, identify whether you’re running a 240-volt double breaker (Intermatic T104M) or a 120-volt single breaker (Intermatic T101) setup.
Use an AC voltage test meter to verify power reaches the timer terminals. Power outages and surges can silently disable units even without tripping breakers. During digital pool timer troubleshooting, check that electricity flows consistently to the unit. If the breaker has tripped, switch the timer’s power to the off position before resetting. Repeated trips signal deeper electrical faults requiring professional evaluation. If you suspect that surges or malicious activity on your network have affected your timer’s smart controls, verify that any connected devices are functioning properly and haven’t been disrupted. After restoring power, verify that the time and schedule settings are still accurate, as interruptions can cause the timer to lose its programmed configuration.
Reset Your Pool Light Timer After a Power Outage
After a power outage, your mechanical pool light timer loses its time reference, which means you’ll need to realign the yellow dial to the correct time of day. Pull the dial outward and rotate it clockwise until the current time aligns with the time pointer, then check that the on/off trippers haven’t slipped or loosened from the disruption. Tighten the center screw on the yellow dial and confirm each tripper is seated firmly at your desired on and off times to restore proper scheduling.
Realign The Yellow Dial
To restore your pool lighting control system, execute this sequence:
| Step | Action |
|---|---|
| 1 | Grasp the yellow dial’s outer edges |
| 2 | Pull gently outward to disengage gears |
| 3 | Rotate until current time aligns with the fixed silver pointer at 6 o’clock |
| 4 | Release the dial listen for the audible click confirming gear engagement |
| 5 | Verify smooth 24-hour advancement post-reset |
Don’t force the dial if you encounter resistance. Misengaged gears cause dial immobility despite active power input. If the clock still isn’t advancing, consider replacing the timer mechanism rather than the entire unit, as old gears may bind and affect functionality.
Tighten Slipped Trippers
Because power outages knock mechanical timers off their synchronized cycle, the small plastic tabs called trippers often slip from their programmed positions on the yellow dial, breaking your pool light‘s on/off schedule. This common pool light schedule issue stems from loosened center screws and vibration-induced displacement.
To correct this, kill the circuit breaker feeding your timer. Pull the dial outward to release rotation, then align it to the current time. Press each tripper firmly into its designated slot, matching your desired on/off intervals. Tighten the center screw until snug over-torquing risks cracking the dial.
Restore power and verify the timer advances in real time. Monitor one full 24-hour cycle for consistency. If trippers slip again, replace them or upgrade to a digital pool automation system.
Verify Correct Time
When a power outage knocks your pool light timer offline, the internal clock stops tracking real time and it won’t self-correct once power returns. First, check your circuit breaker panel. If the breaker tripped, reset it to the ON position. Repeated trips indicate surge damage requiring professional evaluation.
To reset the timer, switch the breaker OFF. Pull the timer dial outward toward you to engage the time-setting mechanism. Rotate the dial until it aligns with the actual current time. Move the manual switch back to ON.
After reset, verify your start and stop schedule settings. Inspect tripper tabs for correct placement and confirm the center screw holds the dial securely. Successful reset is confirmed when your pool light activates at the corrected scheduled time. Eureka pool lighting problems resolved can lead to a more enjoyable swimming experience. If you continue to face issues, consider consulting with a professional to ensure all components are functioning effectively.
Are Worn Trippers Killing Your Pool Light Timer Schedule?
The small metal trippers mounted on your timer dial control exactly when your pool lights switch on and off and they’re often the first component to fail. When trippers loosen, they slip from their set positions, causing your lights to run longer or shorter than programmed. Bent trippers jam the dial wheel, stopping rotation entirely and preventing timer activation.
Inspect your dial for these diagnostic indicators: trippers clustering together, dangling loosely instead of gripping securely, or tabs misaligned from the switch punch. You can temporarily straighten bent trippers with pliers, but replacement delivers reliable results. New Intermatic-compatible trippers cost little and support up to 12 daily operations. Tighten replacements fully to prevent future slippage and restore accurate scheduling.
Loose Wiring That Stops a Pool Light Timer Cold
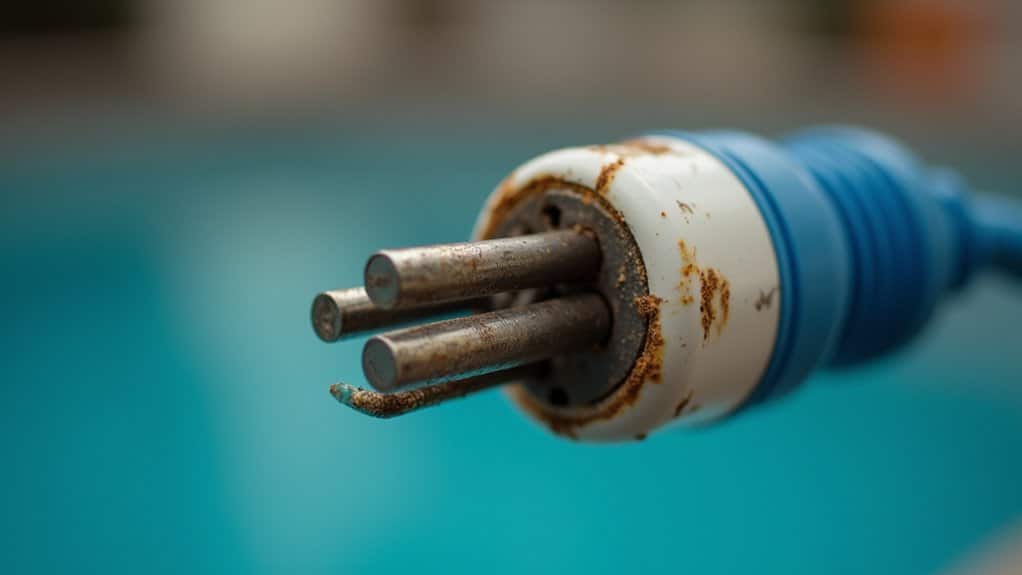
When your pool light timer stops advancing or holds incorrect settings, you’ll want to kill power at the breaker and inspect the terminal board for loose wire connections on the brass screws. Tightening each terminal with a screwdriver and testing wire security with a gentle tug guarantees reliable contact, since vibrations from nearby pool equipment gradually back out even properly torqued connections. While you’re at the terminal board, check for greenish corrosion on contacts corroded terminals increase resistance, generate heat, and can prevent the timer motor from receiving adequate voltage to operate.
Checking Terminal Connections
Because a single loose wire at the terminal board can render your entire timer inoperative, verifying terminal connections should be your first diagnostic step after confirming the breaker hasn’t tripped. Remove the plastic insulator cover to expose the brass screw terminals three on a T101 (120V) or five on a T104 (240V).
For 120V configurations, confirm white neutral connects to terminal A and black line to terminal 1. For 240V T104 setups, verify wires seat on terminals 1 and 3, with ground secured to the green screw. Inspect each connection for burned contacts, corrosion, or looseness. Set your AC meter across the input terminals to confirm voltage reaches the board. Reference the wiring diagram on your timer door to cross-check terminal labeling against your installed configuration.
Tightening Loose Wires
Confirming voltage at the terminal board, as covered in the previous step, only tells half the story if a wire reads energized but sits loosely under its screw, intermittent contact can still prevent your timer from engaging the load circuit.
| Wire Color | Terminal Function | Failure Symptom |
|---|---|---|
| Black | Line hot (L1) | Timer won’t power on |
| Red | Load to light | Light unresponsive |
| Green | Equipment ground | Ground fault tripping |
Kill the breaker, verify zero voltage with your non-contact detector, then remove the plastic insulator cover. Photograph each wire’s position before disconnecting. Reconnect per NEC terminal torque specs, tighten beyond hand-tight with a screwdriver, and tug-test each lead. Pump vibrations loosen brass screws over time annual inspection prevents recurrence.
Spotting Corroded Contacts
Even after you’ve tightened every terminal screw to spec, corrosion on the contacts themselves can silently break the load circuit your timer clicks on schedule, yet the pool light never fires. Green oxidation on copper terminals and pitted relay surfaces prevent clean electrical connection, even when the mechanism operates correctly. Troubleshooting flickering lights underwater requires careful inspection of all electrical connections. Moisture can exacerbate corrosion, leading to sporadic issues that are difficult to trace.
In coastal installations, salt air accelerates contact degradation dramatically. You’ll find terminals that look like they’ve been dunked in saltwater, with corrosion covering half the circuit board on digital units.
To diagnose, remove the plastic insulator and test terminals with a voltage meter. If power reaches the timer but doesn’t pass through the contacts, you’ve confirmed the fault. Cleaning won’t restore pitted contacts replace the mechanism or full timer unit, typically $100 to $300.
Is Your Pool Light Timer Motor Burned Out?
How can you tell if your pool light timer motor has actually burned out? First, verify power reaches the timer by testing input terminals with an AC meter. If voltage is confirmed, inspect the gear assembly through the small observation window near the top of the mechanism. You can also feel for gear movement through the top hole in the metal plate behind the timer dial while power’s on.
A burned-out motor shows specific indicators: gears remain completely stationary despite confirmed power supply, the timer dial won’t advance, and the mechanism stays unresponsive after cycling the breaker. Before condemning the motor, rule out jammed debris in the gear assembly, loose terminal connections, and welded contacts that can mimic motor failure symptoms.
Signs Your Pool Light Timer Needs Full Replacement
When a pool light timer exhibits multiple concurrent failure symptoms, you’re likely past the point of simple repairs and facing a full replacement scenario. A non-advancing clock mechanism combined with stationary internal gears confirms total mechanical failure no single component swap resolves both simultaneously.
Check for these compounding indicators: the timer dial won’t advance past specific times, on/off trips slip from set positions, and the manual override produces zero power transfer. If plate-mounted gears remain motionless despite active power supply, the drive mechanism’s failed irreparably.
Stray external switches should be eliminated as causes first. Once you’ve confirmed power delivery is intact at the panel, yet the timer shows persistent dial stall with no tactile gear movement, full unit replacement is warranted.
How to Choose a New Pool Light Timer
Selecting the right replacement timer requires matching three critical specifications to your existing pool light circuit: voltage rating, load capacity, and installation type. Verify whether your system runs 120 VAC or 240 VAC before purchasing mismatched voltage causes immediate failure. The Intermatic T101 series handles 120 VAC at up to 40A, while the PE153 supports dual 120/240 VAC configurations.
Check your light’s total wattage against the timer’s amp rating. You’ll want a minimum 15A capacity for standard setups, with heavy-duty models like the Intermatic T104R supporting 40A for higher loads. Always maintain headroom above peak draw.
For in-ground pools, choose hard-wired timers with IP-rated metal enclosures. Above-ground setups work with plug-in models like the Intermatic P1101 series featuring 22-inch cords and twist-lock connections.
Frequently Asked Questions
Can a Pool Light Timer Cause the Pool Light Bulb to Burn Out Faster?
Yes, a malfunctioning pool light timer can absolutely burn out your bulbs faster. If your timer’s cycling lights on and off frequently, you’re creating thermal stress that degrades incandescent and halogen filaments considerably dropping lifespan well below their 1,000- and 4,000-hour baselines. Faulty timers also cause voltage fluctuations that accelerate burnout across all bulb types. However, you’ll find LED pool lights resist cycling-related degradation, maintaining their 25,000 50,000-hour rated lifespan despite erratic timer behavior.
Is It Safe to Use a Pool Light Timer With LED Pool Lights?
Yes, you can safely use a pool light timer with LED pool lights. LED fixtures operate at 12V or 24V well below the 36V safety threshold minimizing electrical hazards during timer malfunctions. You’ll need to verify your timer supports the fixture’s voltage specification and confirm GFCI protection is active on the circuit. UL-approved, IP68-rated LED lights maintain waterproof integrity regardless of timer integration, and timer-controlled scheduling actually extends LED lifespan by reducing continuous operation hours.
How Often Should a Pool Light Timer Be Serviced or Inspected Professionally?
You should have your pool light timer professionally inspected at least once per year, ideally before swimming season begins. If you’re running a year-round outdoor pool, schedule inspections every three to four months. For automation and control systems, you’ll want a licensed electrician checking connections and timer functionality every six months. Don’t wait for scheduled service if you’re experiencing erratic cycling, failed triggers, or power irregularities these symptoms warrant immediate diagnostic evaluation.
Can Moisture or Water Damage Inside the Timer Box Cause Malfunctions?
Yes, moisture inside your timer box can absolutely cause malfunctions. Water infiltration through deteriorated seals, cracked housing, or condensation buildup creates short circuits, corrodes internal metal components, and compromises circuit integrity. You’ll notice flickering, intermittent operation, or complete failure. If you spot condensation behind the lens, cut power immediately to prevent electrical shock. You should inspect gaskets regularly and consider upgrading to IP68-rated waterproof components for permanent protection against moisture-induced damage.
Will a Faulty Pool Light Timer Increase My Electricity Bill Significantly?
Yes, a faulty timer can greatly increase your electricity bill. If your timer’s stuck in the “on” position or misprogrammed, you’re running lights and pumps continuously potentially consuming 1,500 2,500 watts per hour unnecessarily. That’s a 20 30% spike in seasonal electricity costs. You’ll want to diagnose the fault code or mechanical failure immediately. Properly functioning timers deliver 30 40% energy savings by restricting operation to scheduled, off-peak cycles only.