XVAC Automatic Inground Pool Cleaner
The XVAC Automatic Inground Pool Cleaner is the first in a modern line of affordable pool cleaners. Manufactured for both its sturdy build and reliable efficiency, the XVAC works to remove sand, silt, dirt, debris, bugs, leaves, and twigs from swimming pool floor and steps.
Guaranteed to make your pool sparkle, this revolutionary innovative cleaner comes with two random cleaning patterns that will allow more pool coverage in shorter cleaning cycles. It’s robust design and one piece body makes this high performance cleaner reliable and easy to use.
• Automatic Suction
• Robust Design 1-piece body
• Revolutionary innovation in affordable pool cleaning
• Open throat design for better debris removal
• 2-Cleaning patterns and shorter cleaning cycles
• Removable cover-plate and hammer for easy cleaning
• Sturdy Construction
• Optimum coverage
• 40 feet of hose included
X-VAC Warranty:
-
- 1 Year Manufacturer Warranty
X-VAC Installation
-
-
- Attach XVAC’s skirt by pulling the skirt over the body (Fig. 1) and correctly positioning it above the foot pad.
- Connect the hose nozzle assembly (Fig. 2) taking care to position the locking nut as shown. Place the safety valve into the skimmer with the arrow in the direction of the water flow.
- Connect the long hose pieces to each other (Fig. 3) and to the XVAC (Fig. 4). There is a short piece of hose that is called the joiner or link hose. Connect one end of this link hose to the safety valve and the other end of the link hose to the long hose pieces, which were just joined together.
-
- Remove air from the system by gently feeding the hose and the XVAC down the side of the pool or feed water into the hose using the return water jet from the filter. When the entire system is in the pool, and the cleaner has settled to the floor, switch on the filtration system and the XVAC should start to operate.
Remember, after unpacking, the XVAC skirt may fail to lie flat. This is normal and can be corrected by placing the skirt on a flat surface in the sun or other warm (not hot) flat surface for a few minutes. The skirt will also flatten through normal usage.
- Remove air from the system by gently feeding the hose and the XVAC down the side of the pool or feed water into the hose using the return water jet from the filter. When the entire system is in the pool, and the cleaner has settled to the floor, switch on the filtration system and the XVAC should start to operate.
-
For further information on the fine tuning and balancing of the hose, please refer to the Troubleshooting guide.
Warning! Do not detach the cleaner from the hose while the pump is on.
X-VAC Care and Maintenance
-
-
- Do not coil hose during storage. Store hose straight!
- Do not leave XVAC or hoses in direct sunlight for extended periods when out of the water.
- To clean, wash with a mild detergent.
- Do not expose XVAC to harsh chemicals.
- Ensure the pool chemistry is correctly maintained.
-
Good maintenance tips
Debris – keep your skimmer basket, pump strainer basket, skim filter, sand filter, cartridge filter (as applicable) free of debris. To ensure maximum suction and cleaner efficiency, backwash your filter at regular intervals. Remember that the XVAC is driven by water flow and that a dirty filter will reduce the water flow through the XVAC and will affect the XVAC’s operation. If the filter is clean and the water flow paths from and to the filter are clear, your water flow rate could be too high and the safety valve should function, or, should be adjusted to reduce the water flow rate to achieve good pool sweeper action.
Cleaning – Keep your XVAC clean and free of algae by washing with a mild detergent.
Wear and tear – Ensure that the XVAC’s skirt, foot pad, bump strip and hammer are in good condition. As the skirt wears, it will become shiny and very smooth. Under extreme wear conditions the skirt will also start to warp and tear. The skirt should then be replaced. The foot pad will also become shiny and very smooth which will reduce its ability to adhere to the pool surface. The foot pad should then be replaced. The bump strip will wear as it comes into contact with pool edges, such as the wall or steps. Wearing is likely to occur in specific spots. To prevent damage to the XVAC’s body, the bump strip can be moved as wearing occurs and then if necessary, should be replaced. The hammer should last for a considerable period but nevertheless should be inspected for wear and when necessary must replaced.
Hoses – Your hoses should be flexible and straight. If your hoses have become brittle they should be replaced and, if not straight, place them in straight positions in the direct sun light for a few hours. Your hoses should be without leaks and should always be securely connected.
Chemical use and your X-VAC – The harsh effects of chemicals in pool water could affect the coloring of your XVAC. This will however not affect the performance and cleaning ability of the XVAC. In order to minimize damage and discoloration, it is recommended that your pool is kept at the correct alkaline and pH (please see below). The XVAC should also be removed from the pool for a minimum of 4 hours when ‘shock’ treatment is employed. Ideal water conditions are:
Fiberglass pools | Marblesheen pools | |
Total alkalinity | 120PPM-150PPM | 80PPM-120PPM |
pH levels | 7.0-7.2 | 7.2-7.6 |
Chlorine | 1.0-0.5PPM | 1.0-1.5PPM |
Safety Valve Information
The safety valve is supplied set at its most commonly used setting. Should XVAC not operate continuously at this setting adjust the valve by changing the positions of the springs to achieve optimum movement of the XVAC. Should XVAC only operate (or fail to operate) with the hose connected directly to the skimmer, this indicates that the filtration system is in need of servicing, there are leaks in the system or the circulation pump is underpowered.
The valve is supplied in two parts. If necessary, the valve body can be separated from the connector and 40mm PVC piping cut to the required length and/or an elbow used. This will prevent the hose from bending at the point of connection (piping and elbow not supplied).
Hose weight
XVAC’s ability to settle on the floor and to move up or down the walls will vary in every pool. The efficiency of the filtration system, the setting of the safety valve, the type of pool hoses and the shape and depth of the pool are factors that will influence XVAC’s performance.
Adjust the hose suction setting (or safety valve setting) and hose length to optimize XVAC’s cleaning pattern. Should you find that XVAC stays on the walls for excessive periods or will not settle correctly on the floor, fit the hose weight supplied on the second hose section closest to XVAC. To do this, bend the inner tabs of the ring by hand, place ring over the mouth of the hose and apply pressure, while gently sliding the hose weight up the hose. Ensure that the hose weight is 1-2 hose lengths from the XVAC. The final position of the weight may be adjusted along the hose length to ‘fine tune’ XVAC’s performance.
X-VAC Troubleshooting Guide
If you have any problems with the XVAC’s operation, please check the following:
-
-
- That your pool’s filtration system is operating in accordance with the manufacturer’s instructions and provides sufficient suction. Remember to check all baskets for debris.
- Remove the hammer chamber cover plate to release the hammer, and remove all debris. Check and ensure that the hammer sealing surface are clear of all debris.Replace the hammer and the hammer cover plate and check that the hammer moves freely.
- Check the XVAC foot pad for wear and tear, and if worn, replace the foot pad.
- Check that the hose connector rotates freely. Remove the locking nut and clear accumulated debris if necessary.
-
X-VAC does not move or it moving very slowly
-
-
- Remove the hammer chamber cover plate to release the hammer and remove all debris.
- Check and ensure that the hammer sealing surface is clear of debris. Replace the hammer and cover plate and check that the hammer moves freely.
-
Debris
-
-
- Ensure there is no debris clogging up the cleaner or the basket.
-
Suction
-
-
- Check that there is sufficient suction in your pool’s filtration system and that it is operating in accordance with the manufacturer’s instructions. If necessary, backwash the filter to improve water flow and increase suction.
- If there is strong suction, ensure that your safety valve is functioning correctly. The safety valve should be adjusted if necessary so that there is strong water flow through the valve, and reduce bypass flow.
- Ensure there are no leaks in the hoses, and that they are connected properly.
-
Wear and tear
-
-
- Check the XVAC foot pad and skirt for wear and tear. If worn, replace the foot pad and/or skirt.
- Check the hammer for wear.
-
X-VAC moves a short distance
-
-
- Refer to the solutions listed below “XVAC does not move”.
- Remove hose weight.
-
X-VAC falls on its side
-
-
- Remove hose weight.
- Check that the hose connector can rotate freely (Fig. 2). Remove the locking nut and clear accumulated debris if necessary.
-
X-VAC gets stuck in a particular place
-
-
- Remove hose length.
- Ensure that the return water flow jet is not interfering with the movement of the XVAC.
- If the problem persists, attach a deflector ring just above the XVAC hose connector (deflector ring not supplied).
-
X-VAC does not climb wall
-
-
- Remove hose weight.
- Ensure that the baskets and cleaner are free of debris so that there is maximum water flow and backwash the filter.
- Adjust the safety valve settings to a higher setting. This increases the suction flow through the pool pump.
-
X-VAC climbs out of the water
-
-
- Ensure that the safety valve is working and free of debris.
- Lower the setting on the safety valve to reduce water flow through the valve and increase the bypass flow.
-
X-VAC is moving in a set pattern
-
-
- Change the hose length by adding or removing sections of the hose.
- Ensure that the hoses are in good condition. The hose should not be coiled.
-
Product Warranty: 1 Year Manufacturer Warranty
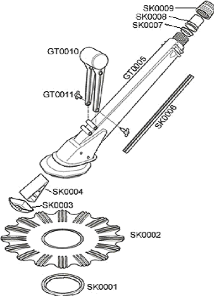
PARTS
SK0001 Footpad
SK0002 Skirt
SK0003 Hammer cover plate
SK0004 Hammer
GT0005 Main body
SK0006 Bump strip
SK0007 Rotation insert
SK0008 Hose connector
SK0009 Locking nut
GT0010 Float arm
GT0011 Float arm screw
HOSE/01 Hose: 1m
SK0024 Automatic weir valve
SK0032 Weir flange adapter
SK0031 Annular hose float
SK0022 Hose weight
SK0035 Deflector ring
DISCONTINUED – See Replacement Model: https://primepoolmarket.com/product/cmp-cleanpro-s-2000-suction-pool-cleaner-model-25563-800-000/
Reviews
There are no reviews yet.